Unit test is a widely used approach by developers to ensure that code does not have errors. Therefore, beginners (and not beginners) need to understand what is and how to use it.
“Unit tests are typically automated tests written and run by software developers to ensure that a section of an application (known as the “unit”) meets its design and behaves as intended”. Source Wikipedia.
Table of Contents
- Unit test
- Two approaches to Unit Test
- Unit Test Java example
- More Unit Test annotations
- Code for you to create/practice Unit Tests
- Summary
Unit test
From the description above, we see that the tests are automated, and they should ensure that a small section of the application should be error-free.
It is important to understand that this type of test is not the only one that software developers usually use. But it is the basic one.
In other words, every programmer is expected to test the code at least at this level.
People with other roles within a software development team, usually make other types of tests: Integration tests, UI/GUI tests, etc.
Another point to have in mind is that it is not computationally possible to determine whether a program will run without any error for any given input.
That being said, Unit Test won’t guarantee that your code does not have errors. However, it is a great starting point to make sure you write quality code.
Once you have written proper unit tests, and your code passes all the tests, you have a high percentage of assurance that your code does not have errors.
Two approaches to Unit Test
You can implement unit testing in your code in two main ways:
- Before you write the code
- After you write the code
The first approach mentioned above is referred to Test Driven Development. As you can see from the term, your development will be directed according to the tests you wrote before you start the actual development.
If you choose the second approach, you write all your code (or part of it) and then write the unit test for the code you wrote.
Each approach has detractors. Probably the decision on where to use one or another will come from the development methodology that the team must follow.
However, you should consider the following as probably the main pro or cons depending on what approach you choose.
If you choose the second approach, because you already wrote the code, the test you write can be “adapted” to the implementation you wrote. This can leave out possible scenarios that may occur.
If you choose the first approach, you write the tests according to the software specification. That will “force” you to write the code independent from the test and can help you identify flaws in your code.
The best way to get a taste of the two approaches is by trying the two of them.
At the end of the post, I’ll give two implementations for you to practice.
Now, let’s see an example in Java Programming Language.
Unit Test Java example
Let’s start with a simple implementation. Below we have a utility class that will help us to sum and multiply two numbers. Yes, I know, that is too simple. But I’ll illustrate the unit test case very well for you.
public class Numbers {
    public static int Sum(int a, int b){
        return a+b;
    }
    public static int Multiply(int a, int b){
        return a+b;
    }
}
In this case, I made a mistake in the second method. We can call this a copy-paste mistake. Because the method signature is almost the same (except for the name of the method) I just copied and pasted the Sum method and change the name, but I “forgot” to change implementation on the second method.
This situation can be more common than you think. I can tell from my own experience.
So, let’s write our unit tests.
Unit Test class
A unit test is a Java Class. Each method of the class will test one method (or unit) of the class we are testing.
Let’s see our code below.
import org.JUnit.jupiter.api.Test;
import static org.junit.jupiter.api.Assertions.assertEquals;


public class NumbersTest {

    @Test
    void sum() {
         assertEquals(10, Numbers.Sum(5,5));
    }


    @Test
    void multiply() {
        assertEquals(4, Numbers.Multiply(2,2));
    }

}
Before each method, we write the annotation @Test. This annotation tells the compiler that it is a unit test. Notice we must include the class (import org.junit.jupiter.api.Test;) from the unit test Java framework.
We create tests by using assertions. The assertions will make sure we get the right result according to a certain input.
In the sum example, we are just saying that the test should “check” if 10 equals (assertEquals) the result of calling Numbers.Sum(5,5). In other words, check if the result of our implementation to sum 5 + 5 equals 10.
The second test is similar. The test framework must check if the result of 2 times 2 (using our implementation Numbers.Multiply(2,2)) equals 4.
If we execute the test, we will see the following result.
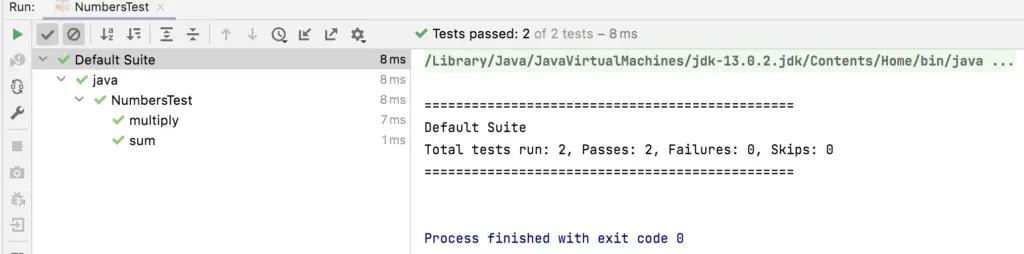
In case you didn’t read some of my previous posts, I use IntelliJ as Integrate Development Environment (IDE). This type of IDE’s facilitates the process for beginners. If you use another IDE, the output you will get can be a bit different than the picture before, but it will give you the same information.
As you can see in the picture above, it shows that the two tests passed. So far, this means your code does not have errors (for the input given).
Usually, inputs for programs are infinite. What is the meaning of this?
It means that you cannot make a unit test for all possible inputs. For instance, this example will sum two integer numbers, how many integer numbers are? Yes, you are right, infinite.
So, what should we do in these cases? We have to cover all the different types of situations that we can come up with.
Adding more unit tests to support more inputs
Let’s analyze our tests.
For the sum, we are just summing positive numbers of 1 digit. For the multiplication, we multiply two numbers that will give the same result if we sum them (2+2=2×2).
So, let’s add more tests so we can cover inputs with different characteristics.
@Test
void multiply() {

    assertEquals(4, Numbers.Multiply(2,2));
    assertEquals(6, Numbers.Multiply(2,3));

}
If we execute the test above, we are going to get the following result.
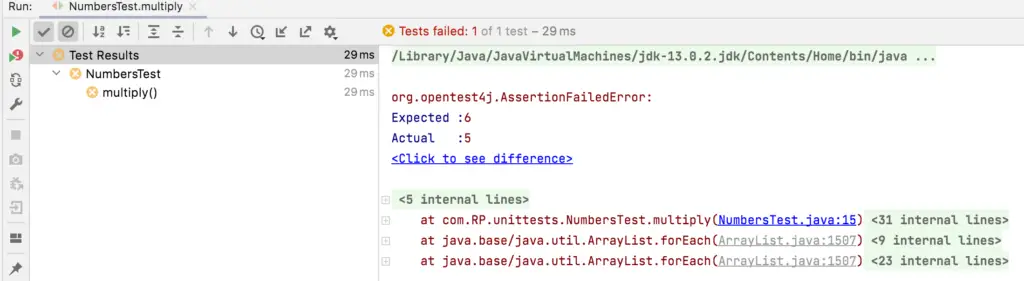
So, what happened?
I happen that there is an error in our implementation. The first one works because it happens that 2×2 equals 2+2. This is just one of the examples of how, even when you write unit tests, your code can have errors.
The takeaway from this is that you must write as many tests as you need, to cover all the different inputs you can. The more different inputs you cover, the more accurate the results of your unit tests will be.
Final implementation
Once you fix the implementation of the method multiply, the code should look like the one below.
public class Numbers {

    public static int Sum(int a, int b){
        return a+b;
    }

    public static int Multiply(int a, int b){
        return a * b;
    }
}
Then, we can extend our unit tests, to check for negative numbers, that we didn’t consider before.
public class NumbersTest {

    @Test
    void sum() {
         assertEquals(10, Numbers.Sum(5,5));
         assertEquals(-1, Numbers.Sum(5,-6));
         assertEquals(10, Numbers.Sum(15,-5));
    }


    @Test
    void multiply() {
        assertEquals(4, Numbers.Multiply(2,2));
        assertEquals(6, Numbers.Multiply(2,3));
        assertEquals(250, Numbers.Multiply(10,25));
        assertEquals(-6, Numbers.Multiply(2,-3));
    }

}
More Unit Test annotations
In the previous example, you only saw the annotation @Test. The reason for this is because it was a simple implementation.
However, there are more annotations useful under certain circumstances.
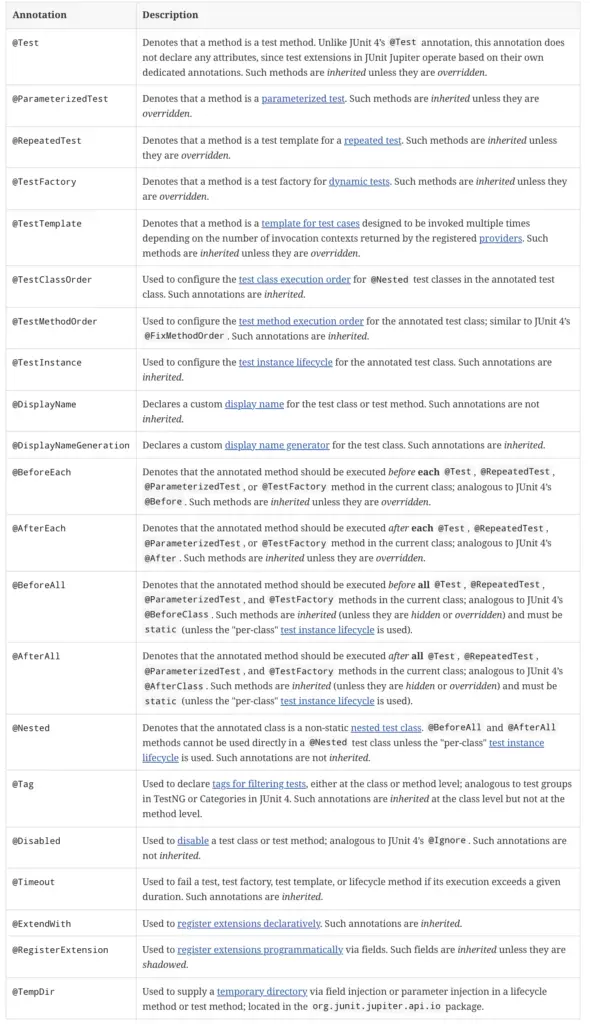
You should not try to memorize all the annotations. Instead, you should look for them as needed.
As an example, imagine that you need to execute certain code before and after each test. Then you can go to the annotation list and look if one of them provides that behaviour.
When you look, you will find four that can be useful: @BeforeEach, @AfterEach, @BeforeAll and @AfterAll. Now, you should read the description and use the one that fits your situation.
Once you implement several tests, you won’t need to look at that table anymore. You already will have them included in your programming arsenal.
Code for you to create/practice Unit Tests
Find below two implementations that you can use to practice unit tests.
Remember to create a Unit Test class for each class you want to test, and one method to test each method of that class.
Example 1: Queue data structure implementation
You can find an explanation of what a queue is in programming and how it is implemented in this post.
Also, you can find a usage example in this post.
import java.util.LinkedList;

public class Queue <T> {

    private LinkedList<T> info;

    Queue(){
        info = new LinkedList<>();
    }

    public void enqueue(T elem){
        info.add(elem);
    }

    public T dequeue(){
        return info.removeFirst();
    }

    public T front(){
        return info.getFirst();
    }

    public boolean isEmpty(){
        return info.isEmpty();
    }

}
Example 2: Stack data structure implementation
You can find an explanation of what a stack is in programming and how it is implemented in this post.
Also, you can find a usage example in this post.
import java.util.LinkedList;

public class Stack <T> {

    LinkedList<T> info;

    Stack(){
        info = new LinkedList<>();
    }

    public void push (T elem){
        info.add(elem);
    }

    public T pop(){
        return info.removeLast();
    }

    public T top(){
        return info.getLast();
    }

    public boolean isEmpty(){
        return info.isEmpty();
    }

}
If you have any questions or problems writing the unit tests for these two classes, leave a comment below. I’ll be happy to help you.
Summary
Unit Test is a powerful method, although not infallible, of testing the code you write.
It is expected that every programmer creates his/her unit tests before his/her code is used in production.
More tests will be done, but the programmer must create this type of test, so he/she makes sure that the code has a minimum level of quality.
H@ppy coding!
Related posts:
